Absolute Radiance
| The Radiance | Absolute Radiance |
 The plague, the infection, the madness that haunts the corpses of Hallownest... the light that screams out from the eyes of this dead Kingdom. What is the source? I suppose mere mortals like myself will never understand.  |
Absolute Radiance is the final boss of Godmaster in Hollow Knight. She is the perfect form of the Radiance and sits at the peak of the Pantheon of Hallownest.[3]
Behaviour and Tactics
Absolute Radiance's attacks are also almost identical to the Radiance's but come at a much faster pace. She also has an altered final Phase. Her fight contains the following attacks with any modifications stated:
- Beam Burst: Absolute Radiance fires near instantaneous sets of beams fired back to back.
- Sword Burst: Absolute Radiance now summons two sets of swords instead of one, the second is rotated from the first.
- Sword Rain: Absolute Radiance's swords fall faster and at a shorter interval in Phases 1 and 2. Sword fall speed is the same in Phase 3 but the interval is slightly shorter.
- Sword Wall: Absolute Radiance's swords travel faster but only in 3 sets in Phases 1 and 2. Sword speed and total sets are the same as the Radiance's during Phase 4.
- Wall of Light: Absolute Radiance's wall travels faster.
- Orb: The colour and visuals of the orbs are more vibrant, they travel twice as fast, and take much tighter turns to home in onto the Knight. Absolute Radiance summons these about 1 second apart. She summons 3 to 4 of these orbs.
- Spike Floor: Absolute Radiance's spikes spawn every 6 to 8 seconds in Phase 2. They are constant in Phase 3.
- Big Beam: The beam is slightly thinner and becomes dangerous within half a second. The beams also come every 1 second with each beam starting just as the last one ends.
- Orb Barrage: The only new attack features slower orbs but are constantly fired every 2 seconds. These orbs behave much more like the Radiance's orbs and disappear if lead off-screen. This attack is only used in Phase 6.
| Stagger Values | |
| Description: Absolute Radiance's stagger is based on her health, and she staggers two times at two predetermined points:
Transition from stage 3 to 4 (1850 HP / 1150 DMG). Absolute Radiance collapses onto the ground, is wrapped up by Void Tendrils but breaks free. One strike to end the fight (719 HP / 2181 DMG). | |
| Hits: - | |
| Combo: - | Combo Time: - |
Fight Breakdown
|
In general, panic heals are more costly here due to Absolute Radiance's double damage and attack frequency. Throughout the fight, except in Phases 3 and 5 and a few exceptions, Absolute Radiance teleports around the arena every 2 to 2.5 seconds. She does not teleport during her Beam Burst, Sword Burst, or Orb attacks. Absolute Radiance deals no contact damage. Attack MitigationsBeam BurstAbsolute Radiance uses this attack in Phases 1, 2, and 4. Absolute Radiance can be damaged throughout this attack using any attacks that are as quick to execute as a Nail attack. Longer Spells and other attacks are safer to use during the last burst. Healing without Charms is safest during the last burst. Due to the random patterns of the bursts, it is possible to heal throughout this attack but only if the pattern does not necessitate movement. OrbAbsolute Radiance uses this attack in Phases 1, 2, and 4. Orbs can last long enough to still exist during another attack from Absolute Radiance. Because the Absolute Radiance does not move during the majority of this attack, there are several opportunities to damage her throughout the attack. Orbs are vulnerable once they've been active for at least .5 seconds. This means they can be destroyed on the floor, platforms, or with a shadow dash. Healing without Charms is almost impossible, requiring the last Orb to be destroyed as quickly as possible and Absolute Radiance's next attack must take some time to reach the Knight. There are two different visual glitches that can occur randomly with this attack:
Sword BurstAbsolute Radiance uses this attack in Phase 1, 2, and 4. Absolute Radiance can be damaged throughout this attack using any attacks that are as quick to execute as a Nail attack. Longer Spells and other attacks are safer to use during the last burst. Desolate Dive/Descending Dark (only stated as Descending Dark from now on) can be used to dodge the Swords. Healing without Charms is safest during the last burst. Due to the random patterns of the bursts, it is possible to heal throughout this attack but only if the pattern does not necessitate movement. Sword RainAbsolute Radiance uses this attack in Phases 1, 2, and 3. In Phases 1 and 2, Absolute Radiance teleports during this attack so dodging the Swords is the first priority, second being damaging her with whatever attacks the Knight wants. Caution must be exercised when striking Absolute Radiance with the Nail because without Steady Body, striking one of the Swords may cause the Knight to bounce into another Sword. This problem can be mitigated by striking upwards. Healing without Charms is safest during the last set of Swords. Due to the random patterns of the Rain, it is possible to heal during this attack but only if multiple patterns do not necessitate movement. Sword WallAbsolute Radiance uses this attack in Phases 1, 2, and 4. Absolute Radiance teleports during this attack so dodging the Swords is the first priority, second being damaging her with whatever attacks the Knight wants as the walls traverse the arena. The walls can be dodged a myriad of ways: circle jumping, shadow dashing, Descending Dark, pogoing on the end of a Sword, and double jumping. Healing without Charms is safest during the last Wall. Due to the random patterns of the walls, it is possible to heal throughout this attack but only if multiple patterns do not necessitate movement. Wall of LightAbsolute Radiance uses this attack in Phases 1, 2, and 4. The Knight can dodge this attack only with shadow dashing or Descending Dark. Before the wall reaches the middle of the arena, Absolute Radiance remains stationary. After, Absolute Radiance begins another attack. The Knight can damage Absolute Radiance with any attacks before the wall reaches the middle. Healing without Charms is possible if the Knight begins healing before/soon after the previous attack ends. Spike FloorAbsolute Radiance uses this attack in Phases 2 and 3. This attack reduces the safe floor space available to the Knight by blocking off half of the arena floor (in one group in Phases 2 and split at each ends in Phase 3). The spikes can be removed temporarily if the Knight enters their hitbox such as by bumping into them, casting Descending Dark, shadow dashing, or touching them while still invulnerable from taking damage. In Phase 2, the spikes return when they are supposed to in that 6-8 second pattern. In Phase 3, the spikes return almost instantly. Pogoing is also a viable way to navigate the spikes. Big BeamAbsolute Radiance uses this attack in Phase 5. Her accuracy improves the higher the Knight gets. It is possible to lead the beams to keep the Knight safe during the ascent. Healing without Charms is possible at the start of Phase 5. Orb BarrageAbsolute Radiance uses this attack in Phase 6. The Orbs die as soon as they are fully off-screen. Leading Orbs off-screen as soon as possible grants the most safe time to damage Absolute Radiance however the Knight can. A reliable strategy is to Nail-bounce on Absolute Radiance until she is dead because Orbs reliably fly off-screen while the Knight remains relatively safe above Absolute Radiance. Healing without Charms is impossible during this attack. Phase BreakdownPhase 1When Absolute Radiance spawns, there are a few seconds before she begins attacking so use this time to hit her with Nail attacks or Spells. In this Phase, Absolute Radiance uses her Beam Burst, Orb, Sword Burst, Sword Rain, Sword Wall, and Wall of Light attacks one after the other in random order, all while hovering above the floor. Phase 2Absolute Radiance continues using the same attacks as Phase 1, but now adds the Spike Floor attack. The restrained space makes it more dangerous to manoeuvre and to stall out the cooldown of the Shadow Dash. Absolute Radiance outlines the Spike Floor's new location with a golden glow for about 2 seconds as a warning before they actually emerge. Be sure to use the warning and not panic; take the time to avoid any in-progress attack before moving to safe ground. The spikes only deal one mask of damage, so if forced to take damage between these and other attacks, it is better to hit the spiked ground. Phase 3Absolute Radiance floats in the center of the arena, splits the Spike Floor to the edges, and endlessly attacks with Sword Rain. It is possible to heal without Charms but it's recommended to get through this Phase first because there is enough time between Phase 3 and 4 to heal up to 6 times (without Charms). Phase 4Absolute Radiance uses her Beam Burst, Orb, Sword Burst, Sword Wall, and Wall of Light attacks in an arena of a variety of small platforms over the Void. Navigating the arena to attack Absolute Radiance can prove dangerous, requiring landing safely on platforms while dodging her variety of attacks. Remaining on one platform and waiting for Absolute Radiance to come there is a slow but reliable strategy. The plethora of platforms can protect the Knight from the Orb attack. Healing is safer than in previous Phases thanks to the greater distance that can be put between the Knight and Absolute Radiance. Though this greater distance can be troublesome with the Sword Burst attack given the curving trajectories. The larger size makes healing during the Wall of Light much safer as well. Falling into the Void deals 1 mask of damage and may be the better option than taking double damage from a regular attack. When Absolute Radiance flees to start Phase 5, healing without Charms is possible while the Big Beam's accuracy is poor. Phase 5This Phase involves ascending by jumping up platforms while the Void rises (with a delay) to whatever platform the Knight has reached (whether they have touched it or not). Her only attack in this Phase is the Big Beam. Once the Knight passes the plane of the two small platforms, Phase 6 begins. Phase 6At the start of this Phase, Absolute Radiance's health is set to 1000. During this Phase Absolute Radiance only uses the Orb Barrage attack. Absolute Radiance only teleports between three locations (left, right and center), her pattern is random. Staying on the platforms and attacking Absolute Radiance while avoiding Orbs is a viable strategy. It is possible to continuously Nail Bounce off of Absolute Radiance until she is defeated. Doing so causes the Orbs she summons to de-spawn offscreen as they attempt to home in on the Knight. It is important to be mindful of where she teleports next, so that the Knight can dash forward and continue Nail-bouncing. After she reaches 719 health or less, she teleports to the middle position and continues to spawn orbs while staying stationary. CharmsBecause this fight is always prefaced by Pure Vessel (if fought in the Pantheon of Hallownest), it is important to consider that fight too when choosing what to bring to the Absolute Radiance fight. Many Charms are viable when fighting Absolute Radiance and greatly depend on play style.
|
Variations
 |
Radiance Hall of Gods text: "Forgotten god of light" | ||
| Pantheon | Pantheon of Hallownest, final boss | ||
| Health | |||
| 2181 | |||
| Arena changes | Same arena as the Pantheon fight, no difficulty differences, although it is expanded for Absolute Radiance's final Phase. | ||
Dream Nail Dialogue 
- ...ANCIENT ENEMY...
- ...I DO NOT FEAR YOU...
- ...LET ME BE FREE...
- ...I WILL NOT BE FORGOTTEN...
- ...DAWN WILL BREAK...
- ...THE LIGHT CANNOT BE CONSUMED...
Gallery
-
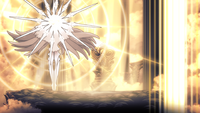
Sword Burst and Wall of Light attacks
-
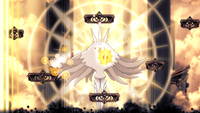
Orb attack
-
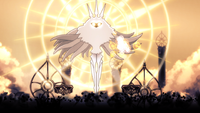
Orb Barrage attack
-
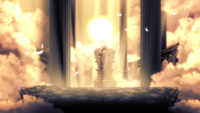
Arena in phase 1-3
-
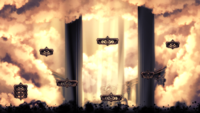
Arena in phase 4
-

Arena in phase 6


Achievements

|
{S} Embrace the Void |
|---|---|
| Ascend the Pantheon of Hallownest and take your place at its peak. 50G |
Trivia
- Absolute Radiance has no proper Hunter's Journal entry. Defeating her instead unlocks the Radiance's entry if it was not already unlocked.
- In version 1.4.3.2 or below, there is a glitch during Phase 4 of the fight. When Nail-bouncing on Absolute Radiance when she is at the very top of the screen, it is possible to cause the Void to rise up and fill the screen completely, resulting in continuous damage and death. This is a glitch caused by the game being programmed to start the ascending Phase (Phase 5) if a certain height is reached. Staying away from the top of the screen during Phase 4 prevents this glitch.
References
- ↑ Developer note: "The moths sealed Radiance away by forgetting about her."
- ↑ French translation: "Déesse oubliée de la lumière" (Forgotten goddess of light). Portuguese translation: "Deusa esquecida da luz" (Forgotten goddess of light).
- ↑ Godseeker: "But couldst thou ever hope to overcome that mighty God tuned at the core of dream and mind, when met in perfect state, at peak of all others?"