Radiance
| The Radiance | Absolute Radiance |
 The plague, the infection, the madness that haunts the corpses of Hallownest... the light that screams out from the eyes of this dead Kingdom. What is the source? I suppose mere mortals like myself will never understand.  |
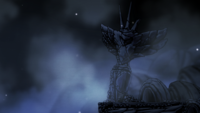
The Radiance is the secret final boss of Hollow Knight. ![]() Absolute Radiance is her perfect form.
Absolute Radiance is her perfect form.
Lore
The Radiance is a higher being[3] of light similar to Essence, and as such, opposed to the Void, her ancient enemy.[4][5] The Moth Tribe is born from her light and in return revered her.[4]
|
After the Pale King arrived in Hallownest and expanded the minds of his new subjects,[6] the Moth Tribe turned their backs on the Radiance and worshipped him instead.[7] In doing so, the Radiance was almost entirely forgotten, yet traces of her memory remained, such as a statue on Hallownest's Crown. Her memory started spreading throughout the Kingdom, by then in its golden age. Soon, all of Hallownest began to dream of her appearing to them as a blazing light.[8] These dreams could break the minds of bugs[9] and eventually enslave their wills to her.[10] However, the King and his subjects resisted her memory, which then started to manifest as the Infection.[11][12] With the Infection, the Radiance offered unity to bugs at the cost of a mind incapable of thought.[13] The Pale King attempted to stop the Infection by sealing the Radiance within a Vessel. These creatures, infused with the Void to be without a mind and without a will, were to be able to withstand the Radiance's influence.[14] The Hollow Knight was chosen, raised, and grown for that purpose. The Radiance was sealed within them, and the Vessel was chained within the Temple of the Black Egg. However, the Vessel had attained impurities of mind.[15] Because of this, the Radiance was still able to invade the dreams of bugs. She ultimately wiped out the inhabitants of the Kingdom, whose King had vanished, but left the rest of the land untouched.[16] Time passed, Hallownest turned into a myth while the Radiance remained sealed. Her influence finally started to break out of the Hollow Knight.[17] She reignited the Infection, threatening again the land of Hallownest and prompting the Knight to return.[18][19] |
In-game events
From her prison, the Radiance, heart of the Infection, plagues the dreams of bugs. She infects Myla[20], causing her to attack the Knight, and uses Lightseeds and Infected flies to reanimate the Broken Vessel and the Watcher Knights. After killing at least one Dreamer, or obtaining the Monarch Wings, the Infection worsens in the Forgotten Crossroads, turning it into the Infected Crossroads, and making its bugs more violent and dangerous.
Her fate is linked to the end of the Knight's journey. By defeating the Hollow Knight, the Knight is able to seal the Radiance within, taking the place of their sibling within the Black Egg.
|
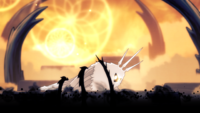
If the Knight uses the Dream Nail on their sibling with the help of Hornet, they have the possibility to challenge the Radiance herself. However, with the Void unified under the Knight's will,[21] the battle takes a tragic turn for her. The Void itself slowly creeps in her dream, seeking to ensnare and consume the Radiance. At the end of the fight, it finally catches up with and immobilises her. The Shade of the Hollow Knight takes advantage to expose her core, to which the Knight's own Shade deals the last blows. The Radiance's Essence bursts out as the Void consumes her and vanishes from the Temple of the Black Egg, putting an end to the Infection. Regardless of Hallownest's recent events, the Godseeker seeks to attune the Radiance to Godhome, where her people can revere the forgotten being as their God of Gods.[22] The Knight can summon her by defeating the Pure Vessel. With the Godseekers' attunement, she becomes the Absolute Radiance, her perfect state.[23] Unbeknownst to the Godseeker however, the Void was also lured within Godhome. If the Knight pushes through the Pantheon of Hallownest, they can challenge the Absolute Radiance in Godhome in a similar fight as within her dream. However as the Radiance is cornered by the Void, the Knight's Shade fuses with it. This time attuned by the Godseekers, they take an all-powerful form and lash repeatedly at the Radiance's core, her Essence bursting out. She finally shatters, putting an end to her plague on Hallownest. |
Behaviour and Tactics
Attacks
|
| Stagger Values | |
| Description: Radiance's stagger is based on her health, and she staggers two times at two predetermined points:
Transition from stage 2-3 (2000 HP / 1000 DMG). Radiance collapses onto the ground and is wrapped up by Void Tendrils but breaks free. One strike to end the fight (1300 HP / 1700 DMG). | |
| Hits: - | |
| Combo: - | Combo Time: - |
Phase Breakdown
|
The Radiance fight happens in 5 Phases. Except in Phases 3 and 5, the Radiance always hovers at various heights above the floor and teleports around the arena every few seconds. She deals no contact damage but the Knight cannot damage her wings or legs. Phase 1The arena is wide open and the Radiance uses every attack but the Spike Floor and Big Beam. This Phase ends after the Radiance has taken 350 damage. Phase 2The Radiance adds the Spike Floor, reducing floor space, generally, by half and continues to use every other attack. This Phase ends after the Radiance has taken 400 damage. Phase 3The Radiance moves to the centre of the arena and remains there. The Spike Floor splits to both sides of the floor. The Radiance uses only Sword Rain endlessly until she has taken 250 damage. Phase 4The Knight finds themself in an arena of small platforms with only the Void (which does only 1 Mask of damage) to catch them. This arena is larger overall than the one in previous Phases. The Radiance uses all attacks except Sword Rain, Spike Floor, and Big Beam attacks in this Phase. This Phase ends after the Radiance has taken 700 damage. Phase 5This Phase is an ascension, jumping from platform to platform, higher and higher, dodging Big Beams (the only attack in this Phase) the whole way. The Void continues to ascend with a slight delay behind the Knight. Once the Knight reaches the Radiance, she must be struck with the Nail just once to end the fight and trigger the final sequence. In the final sequence, the Radiance is bound by Void Tendrils and the Shade of the Hollow Knight appears, tearing open a weak point on her face. The Knight bursts out of their body and becomes their Shade. Attacking causes the Shade to repeatedly whip the Radiance's weak point with long tendrils until she is defeated and dragged into the Void below. |
Charm Sets
|
Occasions to hit the Radiance are limited, and her attacks deal 2 masks of damage, as such high damage is be faced with only limited SOUL. Most successful builds are centred around preserving/increasing resources or removing the need for them. Quick Focus and Deep Focus work well with each other, as Deep Focus makes it possible to recover more health with less SOUL and Quick Focus ensures that healing can be safely performed by reducing the increased time it takes to heal with Deep Focus to the nearly ordinary amount of time it would take while still retaining the ability to heal two masks. SOUL-generation Charms like Soul Catcher and Grubsong are also suggested for this fight, since they boost the Knight's overall soul generation, both for healing and for spells. It should be noted that in the first three Phases, the swordbeams from Grubberfly's Elegy can be used to hit the Radiance without jumping, which can be especially useful when combined with Quick Slash. Grubberfly's Elegy also boosts the effectiveness of Grubsong, making using them together is a viable strategy. Joni's Blessing and Lifeblood Heart/Core can be useful for those who are struggling to heal. Shape of Unn can give extra opportunities to heal, as it allows for the Knight to dodge the Beam Burst, Sword Burst, and Sword Rain attacks while healing at the same time. Works especially well combined with Quick Focus, as it quickens the healing process. A spell-focused build can be employed by forgoing any healing Charms for the Lifeblood Charms described above along with Shaman Stone, allowing the Knight to use Howling Wraiths/Abyss Shriek for high damage. This works because the Radiance has a large hitbox and does not take knockback, so she is hit by all four damaging hitboxes of the spell. |
To access the Radiance, the Knight must have acquired Void Heart and have used the Dream Nail on the Hollow Knight when Hornet holds them down. The Radiance does not count as a regular dream battle, so the Hollow Knight needs to be fought from the beginning on every death.
In the first Phase of the fight, she levitates slightly above the floor. Only her body is vulnerable to attack, which requires jumping or ranged attacks. She often teleports around, making it even harder to get a good string of hits while avoiding her own ruthless attacks.
The Radiance does not deal contact damage; however, all of her attacks except summoning spikes deal two Masks of damage. Falling off the platform only deals one Mask of damage.
The Radiance has a wide variety of attacks, each with a variety of mitigations.
- Beam Burst: A beam never strikes in the same place consecutively (so burst 1 and 3 may be almost exact). The Radiance does not move during this attack, and therefore spells like Howling Wraiths/Abyss Shriek or Nail Arts are a viable option, given her large hitbox. Healing without Charms can be done throughout this attack (especially with lucky burst patterns) but healing is safest to start once the third burst pattern is known.
- Sword Burst: Everything said about the Beam Burst applies to the Sword Burst except in this case, there is only the one burst to consider. Thus, the Knight can begin healing just about as soon as the attack starts.
- Sword Rain: The Radiance teleports during this attack so damaging her while dodging the swords is difficult. Abyss Shriek is useful at the end of this attack, and Nail attacks allow for flexible and quick damage while the Radiance is within reach. Healing without Charms is possible once the last set of swords is seen or throughout the attack if arrangement of swords allows for it.
- Sword Wall: The Radiance teleports during this attack, so damaging her while dodging the swords can be difficult. The safest method is to use Nail attacks when the Knight is near the Radiance. It is possible to use the Shade Cloak and dash through the swords, but it is not possible to dash through all of them, since the Shade Cloak has a cooldown. Healing without Charms is only viable if the wall patterns are forgiving or the Knight starts healing on the side of the arena opposite the wall's spawn. This is more forgiving in Phase 4 because the walls move slower.
- Wall of Light: This attack must be dodged either with a shadow dash or Descending Dark. The Radiance teleports during this attack so quick damage is most viable. Healing without Charms is safest if the Knight gets through the wall quickly or starts healing when a wall spawns on the opposite side of the arena. This is more forgiving in Phase 4 because the wall moves slower.
- Orb: The Orb attack requires quick movements. It is best to try to bait Orbs into the floor or platforms to destroy them early, leaving more time to attack the Radiance. Using the Shade Cloak to dash through a projectile destroys it, and can be useful if multiple projectiles are close to each other. There is no time to heal without Charms or getting lucky with the platforms in Phase 4.
- Spike Floor: The Radiance spawns short spikes covering half of the floor. Unlike all other attacks used by the Radiance, this attack deals only one mask of damage. The spikes disappear for up to 5 seconds if struck by the Knight's body or hit with Descending Dark. The spikes almost immediately return in Phase 3.
- Beam: The Radiance fires one beam of light, targeted at the Knight. This attack becomes more accurate the higher the Knight gets during Phase 5. It can be baited to fire and miss the Knight, since the attack is used at regular intervals.
Dream Nail Dialogue 
- ...ANCIENT ENEMY...
- ...I DO NOT FEAR YOU...
- ...LET ME BE FREE...
- ...I WILL NOT BE FORGOTTEN...
- ...DAWN WILL BREAK...
- ...THE LIGHT CANNOT BE CONSUMED...
Location
The Radiance's fight can be accessed by using the Dream Nail on the Hollow Knight in the Temple of the Black Egg.
-
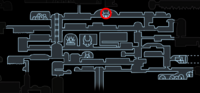
Location in the Forgotten Crossroads

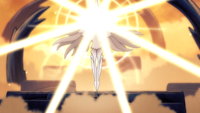
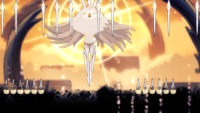
Gallery
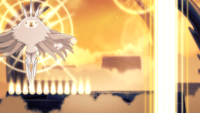
-
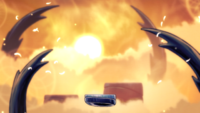
The Radiance's initial appearance
-
Beam Burst attack
-
Sword Rain attack
-
Wall of Light attack
-
The Radiance staggering
-
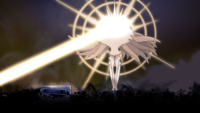
Big Beam attack
-
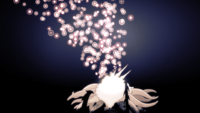
The Radiance being dragged into the Void
-

Dream in which the Radiance is fought
-
The Radiance statue at Hallownest's Crown containing Pale Ore


Achievements

|
{S} Dream No More |
|---|---|
| Defeat the Radiance and consume the light. 50G |
Trivia

- There is a statue of the Radiance at the top of the map in Hallownest's Crown where a Pale Ore can be found. Dream Nailing this statue yields the lines:
- "...Remember... Light..."
- Through HUD manipulation, the Radiance is shown to actually have 3000 health, though the "fight" portion of the battle ends when she reaches 1300 health, effectively requiring the Knight to only have to deal 1700 damage to win the fight.
- The Radiance is one of the two bosses that has a full-screen title card, the other being
 Nightmare King Grimm.
 - The Radiance must be challenged to a battle the first time she is fought after loading a save file. Her introduction is abridged after dying to her once, causing her to attack directly upon entering her arena. The introduction returns after reloading the save file.
References
|